Home Made Ice Cream in a Bag
You will need pint ziplock freezer bags, gallon ziplock freezer bags, whole milk, sugar, vanilla, rock salt (or kosher or canning salt), lots of ice, bath towels, and a friend.
In each pint bag, mix 1 cup whole milk, 2 Tablespoons sugar, and 1/4 teaspoon vanilla extract. I found it easier to put the sugar and vanilla in the bag first, then pour in the milk and zip closed, removing air as you tightly seal the bag. This will make one bag of home-made ice cream.
To make the ice cream, fill a gallon ziplock freezer bag 1/2 full of ice. Sprinkle on 1/4 cup rock salt. Place one or two bags of milk mixture inside, then fill bag with ice and sprinkle on another 1/4 cup of rock salt. Seal bag tightly. Cover with a bath towel, making sure to keep the top of the sealed bag upright. Then...shake vigorously and continually for 5-10 minutes. Choose a partner to help with the shaking, being CAREFUL not to DROP IT!! Ice cream is "done" when the milk bags feel firm when squeezed. Remove ice cream bags from larger bag of ice & water. Wipe the outsides of the ice cream bags to remove any salt residue. You can eat right from the bag or can pour it into a bowl.
The salt makes the ice colder as it causes it to melt. The towel helps keep your hands from freezing as you shake the bag. If you used rock salt, Do Not Pour the ice & water Down The Drain!!! The rocks leftover from the dissolved salt will Clog the drain! Empty the ice & salt water mix onto a gravel driveway or in a street gutter. Do Not Pour On Concrete, Sidewalks, Or Grass!!! The salt will Damage the surface of the Concrete or Sidewalk and will Kill Grass!!!
Oooey Gooey Ooobleck
In a large bowl, mix 1 box cornstarch with small amount of water. Food coloring may be added for fun. It will be very hard to stir. Add more water carefully. You can grab a handful and roll it into a ball quickly, then let it slowly flow through your fingers back into the mix. It will bead up on the table and can be scraped into bowl when finished playing. Sprinkles are fun to add to the top and watch the colors swirl and mix. I bought my cornstarch at the Dollar store for $.75 a box. Food coloring was $1.00. For very bright colors, I used leftover Easter egg dye.
Exploding Sidewalk Chalk
Mix 2 Tablespoons cornstarch with 1/4 cup white vinegar. If you want color, add food coloring to vinegar before mixing with cornstarch. Pour into sandwich zipper-lock baggie. Place 1 teaspoon baking soda in center of 1 square of toilet paper. Fold toilet paper into square packet. Tightly seal sandwich bag 3/4 closed, then add toilet paper packet, and zip tightly closed. Shake quickly and toss on sidewalk. I used very inexpensive baggies, so they popped easily. The colored cornstarch splat decorates the sidewalk after it drys. It can easily be washed off with garden hose or pour a bucket of water over it. The small amount of food coloring doesn't stain the sidewalk, but may stain clothes! I bought all my supplies at the dollar store, including the 100 sandwich bags for less than $5.
Fizzy Frozen Sidewalk Chalk
Mix 1/4 cup cornstarch, 1/4 cup baking soda, and 1 cup water. Food coloring or liquid watercolors may be added. I used leftover Easter egg dye for very bright colors. Stir well and pour into ice cube tray. Freeze until solid, then pop into plastic bag to store in freezer. On a hot day, draw or smash on sidewalk. When your design is finished, pour white vinegar over to see the reaction. Vinegar can be poured into squirt containers (like empty dish soap bottles) because it's always more fun to squirt! Designs will wash off with garden hose or bucket of water. Food coloring will not stain sidewalk, but may stain clothes! A fun way to be creative on a hot, hot day.
Microwaved Ivory Soap
Using adult supervision, place an unwrapped bar of Ivory brand soap on a paper plate. Place in microwave and close door. Microwave on HIGH for 40-45 seconds. Remove and examine. Careful--it will be hot! Soap will fluff up and look like shaving cream, but will be dry to the touch. Crumbled soap can be put into bowl or plastic container with small amount of water and stirred. Leave set for a few days and it will look like a bar of soap again. Try seeing if it still floats.
"Egg-stra" Special Colored Eggs
Boil a dozen eggs and let cool until you can handle them. Using a white or any light color (NOT BLACK) of wax crayon, draw a design on the egg. (This would be a good time to use up some extra broken crayons leftover from school boxes.) Carefully set egg in 1 cup water mixed with 1 Tablespoon white vinegar and 15 drops of food coloring or use Easter egg dye. (I put my coloring mix in mugs and use tablespoons to lift eggs in and out of dye.) When egg is desired color, gently lift out and set on wire cooling rack set over several layers of paper towels. The dye will color the egg except where the wax was. Remember the order of dying eggs: yellow, green, blue, orange, red, purple, and black. When dry, draw another design on egg and gently set into another color dye. Repeat steps until egg is decorated. If you want to see what the egg looks like without the wax, gently set eggs on foil covered cookie sheet and place in 300 degree oven for 3 minutes. Parental supervision and help is needed for this!!! Use an old towel or many layers of paper towel to wipe surface of egg. Repeat until wax has been melted from egg. Set egg on shelf and do not disturb. Left alone, the boiled egg should dry up and be preserved without smelling. Good luck!
I SPY Bottles
You need a clean, empty drink bottle (Gatorade, Powerade, iced tea, etc.) with a large opening and lid. Place 5 items in the empty bottle, and cover with about 2/3 c. uncooked rice or birdseed. Add more items and cover with more filler. Leave at least 2 inches empty at top of bottle. Glue lid onto bottle. Here is a list of items we placed in our bottles:
| Bead | Pencil Eraser | Birthday Candle | Button |
| Push Pin | Cotton Swab | Penny | Tooth Pick |
| Ring | Googly Eye | Sea Shell | Bobby Pin |
| Nail | Pom Pom | Puzzle Piece | Paper Clip |
Glitter Bottles
Glitter Bottles were made using a clean, empty drink bottle and lid, hair gel, and glitter.
Add about 1 inch of hair gel to your bottle. Add a spoonful or two of glitter, sequins, beads, or whatever to your bottle. (Glitter can sometimes hide the sequins when shaken.) Carefully pour in 1 inch of hot water (we warmed ours up using a coffee maker). Screw lid on tightly and shake gently to mix. Add 1 drop of food coloring, if wanted, and fill bottle half-full with tap water. Screw lid on tightly and shake to mix. You will have to shake awhile for it to mix completely. The hair gel also makes the water foam, so it may take awhile to settle. You can scoop foam off it needed. Carefully remove lid and slowly add water to within 1/2 inch of top. Apply a bead of waterproof glue to outside thread of bottle. Screw lid on tightly. Let set overnight for glue to dry, then shake your glitter bottle as much as you like.
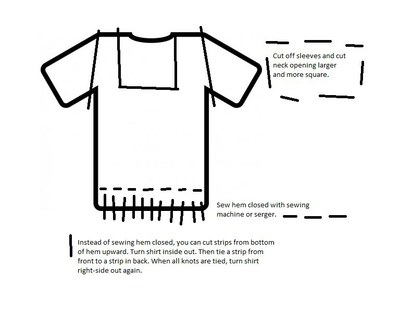
Recycled T-shirt Bag
Cut the sleeves off of a t-shirt you no longer want to wear, cutting along the seam.
Cut the neck area larger and square. I folded the shirt in half with the front of the shirt facing out, cutting down from neck and across to the fold.
Turn shirt inside out and sew bottom hem closed.
Or…cut 1-inch strips from bottom of hem upward about 4 inches. Turn shirt inside out, and tie one strip from front side to one strip from back side.
Turn right-side out and enjoy.